
Views: 236 Author: Miluo Smart Home Publish Time: 2026-08-18 Origin: Site


Content Menu
● Why Uneven Floors Create Freestanding Tub Risks
>> The Main Installation Consequences
● Anti-slip vs. Leveling: Two Different Functions
● Anti-slip Techniques Around Freestanding Bathtubs
>> Select Flooring for Wet-Use Traction
>> Use Drainage to Support Safety
>> Add Practical Surface Protection
● Leveling a Freestanding Tub on an Uneven Floor
>> Step-by-Step Leveling Process
>> When Adjustable Feet Are the Best Option
● Choosing the Right Leveling Solution
● Material-Specific Installation Considerations
>> Solid-Surface and Stone-Resin Tubs
>> Metal or Cast-Iron Style Tubs
● Expert Insight: Drainage Must Be Tested After Leveling
● OEM and ODM Design Features That Reduce Installation Problems
● Build a Better Freestanding Tub Solution
>> Can a freestanding tub be installed on a slightly uneven floor?
>> Should a freestanding bathtub be perfectly level?
>> Can installers use wooden shims under a bathtub?
>> Does a non-slip bath mat solve bathroom floor safety concerns?
>> What floor finish works best around a freestanding tub?
>> Why does a freestanding tub rock after installation?
>> Can a heavy solid-surface tub damage a tiled floor?
A freestanding bathtub can become the visual center of a premium bathroom, but its performance depends on more than its shape, finish, or faucet configuration. Anti-slip measures and accurate leveling are both essential when installing a freestanding tub on an uneven floor—especially in hospitality, residential-development, and high-end renovation projects.
For overseas brands, wholesalers, and bathroom-product manufacturers, the right specification reduces installation disputes, improves end-user safety, and protects the perceived quality of the complete bathroom solution. At Jiaxing Miluo Smart Home Co., Ltd., we view a freestanding bathtub not as an isolated product, but as part of an integrated bathroom environment involving flooring, drainage, load support, user movement, and installation conditions.
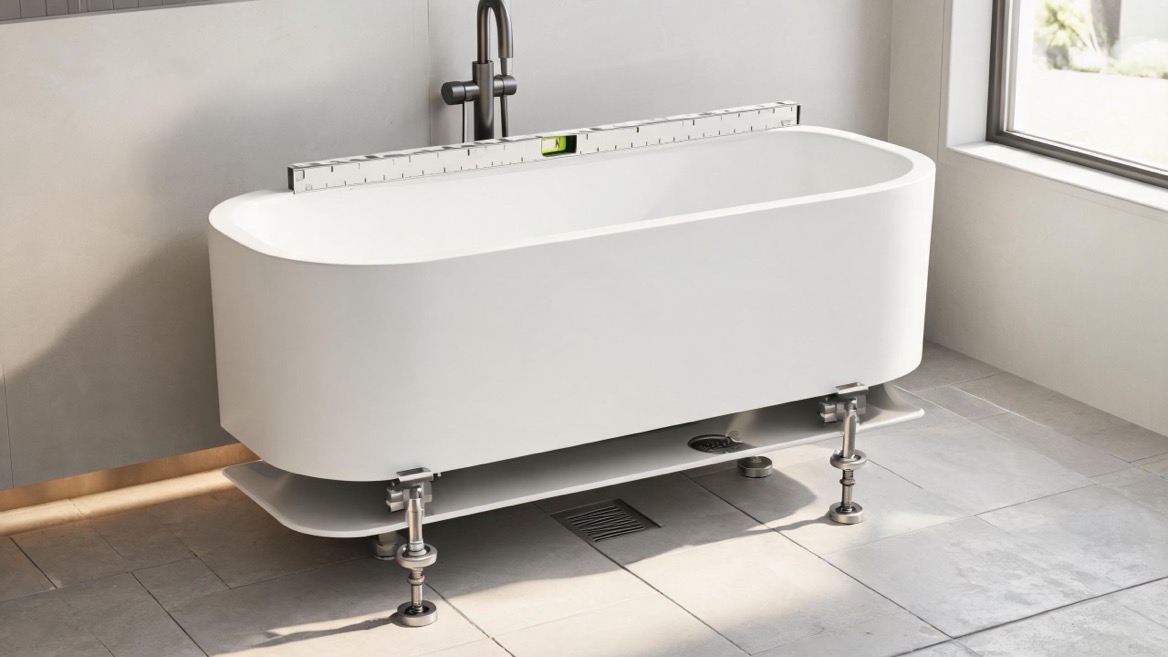
An uneven bathroom floor may look like a minor site issue. In reality, it can affect bathtub stability, drainage performance, user safety, seal durability, and long-term customer satisfaction.
Unlike a built-in bathtub, a freestanding tub is visible from every angle. Its feet, pedestal, base, or bottom support are directly affected by floor flatness. If one contact point does not fully meet the floor, the tub may rock when a user enters or exits. A small movement can gradually stress the drain connection, silicone seal, overflow assembly, or finished flooring.
Common causes of uneven flooring include:
- Tile lippage between adjacent tiles
- Inconsistent screed or cement-bed thickness
- A sloping floor designed for shower drainage
- Structural settlement in older properties
- Weak or flexible subfloors
- Localized high spots around drain openings
- Poorly positioned floor drains beneath the bathtub footprint
A bathroom floor can also be visually level but still have local irregularities. For this reason, installers should inspect the actual contact points beneath the freestanding tub rather than relying only on a general room-level measurement.
| Issue | What Happens | Potential Result |
|---|---|---|
| Tub is not level | Water collects at one end | Slow or incomplete drainage |
| One foot loses contact | Tub rocks under load | Unstable entry and exit |
| Base is not fully supported | Weight concentrates at limited points | Cracking, deformation, or floor damage |
| Drain is under side load | Pipe connection is stressed | Leakage risk over time |
| Sealant bridges a large gap | Sealant stretches or separates | Water penetration and mold risk |
| Floor surface is slippery | User loses traction near the tub | Slip-and-fall exposure |
For a premium freestanding tub, the goal is not simply to make the bathtub "look straight." The goal is to achieve a stable, load-bearing, properly drained installation with safe walking conditions around the bathing area.
Anti-slip and leveling techniques are often discussed together, but they solve different problems. A complete installation requires both.
| Factor | Anti-slip Technique | Leveling Technique |
|---|---|---|
| Primary purpose | Improve user traction on wet surfaces | Stabilize the tub and support drainage |
| Main location | Bathroom floor, tub floor, entry area | Tub feet, base, floor substrate |
| Main risk addressed | Slipping while walking or entering the bath | Rocking, pooling, leakage, structural stress |
| Typical solutions | Textured tile, slip-resistant finish, bath mat, grip coating | Adjustable feet, shims, leveling compound, floor correction |
| Who specifies it | Designer, flooring supplier, project manager | Tub supplier, installer, contractor |
| Common mistake | Assuming a bath mat solves all traction risks | Using shims without checking drain alignment |
Anti-slip protection supports the person. Leveling supports the product. Neither should replace the other.
For example, a bathroom may use textured porcelain tiles with good wet traction, yet still have a bathtub that rocks because one adjustable foot is suspended above a low spot. Conversely, a perfectly level tub can still be unsafe if its surrounding polished floor becomes slick when wet.
The wet zone around a freestanding bathtub deserves special attention. Water can splash during bathing, cleaning, filling, and exiting the tub. This risk increases in family homes, hotels, senior-living projects, and luxury villas where users may step barefoot onto a wet floor.
Flooring selection is the first and most durable anti-slip decision. A highly polished stone-look tile may complement a modern bathtub, but its surface behavior when wet must be evaluated before specification.
For level interior flooring expected to be walked on when wet, ANSI A137.1 identifies a wet Dynamic Coefficient of Friction (DCOF) value of at least 0.42 for suitable ceramic tile applications. However, this threshold should not be treated as a universal guarantee. Surface texture, drainage, cleaning products, bare feet, soap residue, grout joints, and expected user groups all influence real-world traction.
When specifying bathroom flooring around a freestanding tub, buyers should request:
- Wet-slip test documentation from the tile supplier
- Surface-use recommendations for residential or commercial bathrooms
- Information about cleaning-product compatibility
- Samples tested when wet with water and mild soap residue
- Confirmation that the chosen finish is appropriate for barefoot traffic
- Matching transition details between dry and wet bathroom zones
A lightly textured matte tile often offers a more practical balance between luxury appearance, cleanability, and traction than a mirror-polished surface.
Anti-slip performance is not only a material issue. It is also a water-management issue.
A floor with reasonable traction can become hazardous if water remains around the bathtub for long periods. The floor should direct water away from the tub entry area and toward an appropriate drain location. Avoid designs where the floor slopes sharply under the bathtub itself, because that creates a conflict between drainage design and bathtub leveling.
A better approach is to create controlled drainage outside the tub's primary support footprint. In projects with frequent water exposure, such as hotels, spa suites, or assisted-living bathrooms, designers may consider:
- A linear drain near the wet-zone perimeter
- A discreet point drain outside the bathtub base area
- A localized fall toward the drain, not beneath every tub foot
- Waterproofing continuity beneath the finished floor
- A water-resistant perimeter seal where the tub meets the floor
The U.S. Access Board states that walking surfaces should be slip-resistant and designed to minimize slipperiness under expected conditions. It does not prescribe one universal coefficient of friction, reinforcing the need to assess the complete environment rather than depend on a single number.
Supplementary anti-slip products can be helpful, but they should be selected carefully to maintain the premium character of the bathroom.
Suitable options include:
- Removable, quick-drying bath mats with a non-slip backing
- Low-profile teak or composite bath platforms designed for wet use
- Transparent anti-slip treatments compatible with the flooring material
- Anti-slip strips in selected high-risk circulation zones
- Internal bathtub anti-slip texture for products intended for elderly users or hospitality projects
Avoid thick loose mats with curled edges. They can create a trip hazard, retain moisture, and make cleaning more difficult. In commercial projects, any removable accessory should be easy for housekeeping teams to inspect, clean, and replace.

Leveling begins before the bathtub is delivered. The installation team should inspect floor flatness, drain location, structural support, and the final finished-floor height during the planning stage.
A freestanding tub should rest securely on all intended support points. The rim should be level in both directions unless the tub manufacturer specifically designs the product with a controlled internal fall toward the drain.
1. Verify the finished floor condition.
Measure the floor after tile, stone, or other final finishes are complete. Check lengthwise, widthwise, and diagonally across the full bathtub footprint.
2. Identify high and low contact points.
Use a long spirit level, straightedge, laser level, or digital level. Measure at the exact locations where the tub feet, pads, or base will contact the floor.
3. Confirm drain and overflow alignment.
Before final placement, ensure that the floor drain or waste connection aligns with the bathtub drain without forcing the pipe sideways.
4. Dry-fit the bathtub.
Place the tub in its final position before connecting the waste system. Test whether every foot or base section contacts the floor.
5. Adjust the support system.
If the bathtub has factory-installed adjustable feet, make controlled adjustments in small increments. Check the rim from front to back and side to side after every adjustment.
6. Use approved shims only when necessary.
Rigid, waterproof, non-compressible shims may correct small localized gaps. Do not use wood, cardboard, soft rubber, or temporary construction materials.
7. Test stability under realistic load.
With the tub empty, apply pressure at different rim locations. Then perform a water-fill test where project conditions allow. The tub should not rock, shift, or create drain stress.
8. Complete final sealing and cleaning.
Apply compatible sanitary sealant only after leveling and drainage testing are complete. The sealant should close a controlled perimeter gap, not compensate for major floor irregularities.
Adjustable feet are especially valuable for freestanding tubs installed in renovation projects, modular bathrooms, and buildings where the final floor surface may vary slightly from room to room.
For B2B buyers, adjustable feet should be evaluated beyond appearance. Important questions include:
- What is the adjustment range per foot?
- Are the threaded components corrosion-resistant?
- Can the foot be adjusted after the tub is positioned?
- Does the design prevent visible hardware from affecting the exterior appearance?
- Is the foot system rated for the bathtub's filled weight?
- Does the design maintain support without bending the tub shell?
- Are installation instructions clear for overseas contractors?
A well-engineered adjustable support system reduces reliance on site improvisation. This is particularly important for OEM and ODM customers who want to reduce after-sales issues across multiple export markets.
Not every uneven floor should be corrected at the bathtub. The severity and cause of the unevenness determine the best method.
| Floor Condition | Recommended Solution | Avoid |
|---|---|---|
| Minor localized irregularity | Adjustable feet or approved rigid shims | Soft packing materials |
| Slight variation across tub footprint | Adjustable feet plus careful drain alignment | Over-tightening the drain assembly |
| Broad but shallow unevenness | Self-leveling compound before final flooring | Using sealant as filler |
| Major slope beneath the tub | Rebuild or flatten the substrate | Excessive foot adjustment |
| Flexible timber subfloor | Reinforce structural support first | Treating movement as a leveling issue |
| Tile lippage at support points | Rework affected tiles or use engineered support pads | Point-loading a thin acrylic shell |
A key principle is simple: do not force the bathtub to correct a defective floor. If a floor has major slope, movement, or structural weakness, the construction substrate must be corrected before bathtub installation.
The bathtub material affects how installers should approach leveling, support, and protection.
Acrylic tubs are lightweight relative to cast mineral or stone-resin models, but they still carry significant water and occupant loads. Their shells require evenly distributed support to avoid flexing.
For acrylic freestanding tubs:
- Confirm whether the product has a full-support base or adjustable feet.
- Avoid concentrated point loading beneath thin shell sections.
- Protect the surface from scratches during dry fitting.
- Check that the overflow and drain remain aligned after final adjustment.
- Follow the supplied installation instructions for any foam, frame, or support requirements.
Solid-surface and stone-resin tubs are heavier and usually offer excellent visual stability. Their weight, however, makes floor inspection more critical.
For heavier tubs:
- Confirm floor load capacity before delivery.
- Use appropriate lifting procedures to protect the product and installers.
- Ensure the base has full, stable contact where specified.
- Do not rely on thin shims to compensate for major variations.
- Confirm that the finished floor can tolerate concentrated static load.
Metal-based tubs may use visible feet, decorative bases, or traditional pedestal designs. Each support point must be carefully leveled to prevent rocking.
For four-foot designs, verify that all feet contact the floor after leveling the rim. A tub can appear level while still resting primarily on three points, creating movement during use.
One of the most common installation oversights is testing drainage before the tub is fully leveled, then assuming the job is complete. In practice, even a small adjustment to a foot or support pad can change the waste connection position.
Our recommendation for brand and project buyers is to specify a final commissioning sequence:
1. Confirm all support points are stable.
2. Check rim level in both directions.
3. Fill the tub partially and observe the waterline.
4. Release the water and confirm complete drainage.
5. Inspect the drain and overflow connections for leakage.
6. Recheck bathtub stability after drainage.
7. Apply final perimeter sealant only after all tests pass.
This sequence creates a clear handover standard for installers, distributors, and project managers. It also provides a practical way to reduce disputes between the bathtub supplier, flooring contractor, plumber, and general contractor.
For international bathroom brands and wholesalers, installation-friendly product design can be a strong market advantage. A modern freestanding tub should be engineered for both showroom appeal and real construction conditions.
At Jiaxing Miluo Smart Home Co., Ltd., custom bathtub development can consider practical installation features such as:
- Concealed adjustable feet for cleaner visual presentation
- Reinforced bottom structures for improved support stability
- Optimized drain placement for common international plumbing layouts
- Flexible waste-connection access zones
- Removable service panels where appropriate
- Pre-marked support locations for installers
- Customized installation manuals, packaging labels, and private branding
- Matching anti-slip internal textures for selected product lines
- Compatibility guidance for tile, stone, vinyl, and waterproofing systems
For a brand developing a collection for hotels or residential developers, these details can be more valuable than an additional decorative feature. They help the installer achieve a reliable result while protecting the end customer's experience.
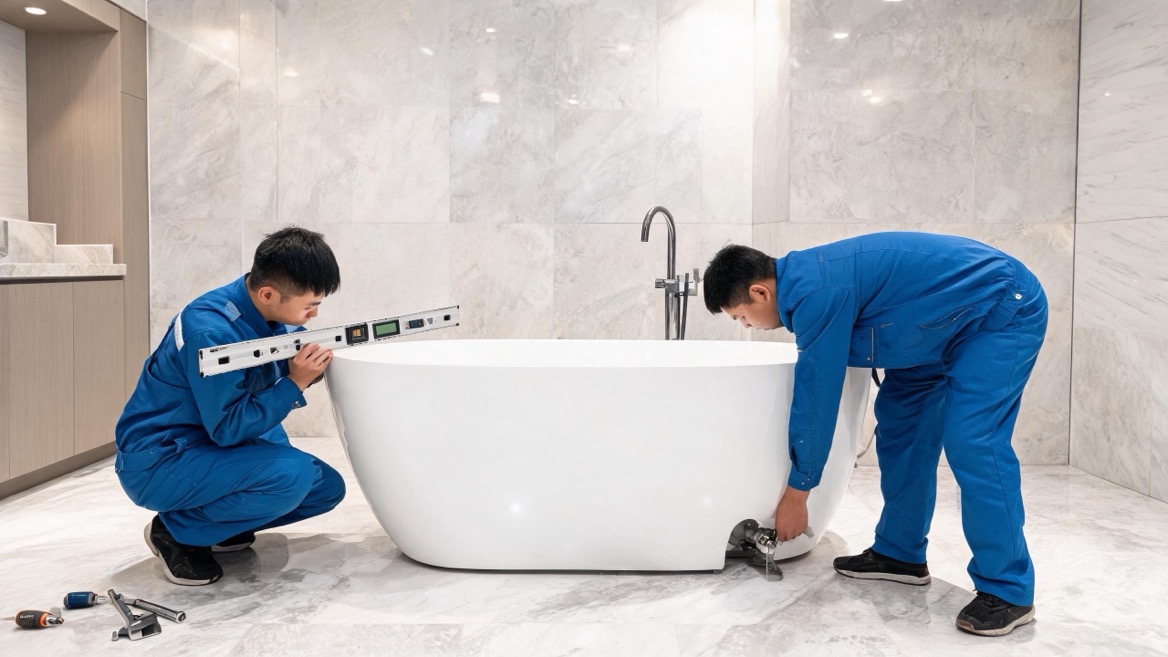
Before installing a freestanding bathtub on an uneven floor, confirm the following:
- The floor is structurally capable of supporting the filled bathtub.
- The finished floor has been measured across the full tub footprint.
- The tub support points have been identified.
- The drain opening is accessible and correctly located.
- The bathtub can be leveled without excessive adjustment.
- All feet or base sections make stable contact with the floor.
- The surrounding floor provides suitable wet-use traction.
- Water can drain away from the user's entry and exit zone.
- The bathtub drain and overflow have been water-tested.
- Final silicone sealing is completed only after stability testing.
A high-end freestanding bathtub should deliver visual impact without creating installation uncertainty. By combining wet-zone anti-slip planning with accurate leveling, stable support, drainage testing, and thoughtful product engineering, brands can offer a safer and more reliable bathroom experience.
Jiaxing Miluo Smart Home Co., Ltd. supports overseas brands, wholesalers, and manufacturers with customized OEM and ODM freestanding bathtubs and coordinated bathroom solutions. Contact our team to discuss adjustable support systems, customized dimensions, surface finishes, drain configurations, branded packaging, and installation-ready product development for your market.
Yes, if the variation is minor and the bathtub includes a suitable adjustable support system. The tub must remain stable, level, and correctly connected to the drain. Major slopes or flexible floors should be corrected before installation.
In most cases, yes. A level rim helps provide even water depth, predictable drainage, and a premium appearance. Always follow the bathtub manufacturer's installation guidance, especially if the product has a purpose-built internal drainage design.
Wooden shims are not recommended because they can absorb moisture, compress, deteriorate, and create long-term instability. Use only rigid, waterproof, non-compressible shims approved for the application.
No. A bath mat can provide additional traction at the exit point, but it cannot correct poor drainage, a slippery floor finish, or an unstable bathtub. It should be part of a broader safety approach.
A matte or lightly textured tile designed for wet interior use is often a practical choice. Select flooring based on wet-slip performance, cleaning requirements, drainage design, visual style, and the expected user group.
Rocking usually occurs because one or more support points do not fully contact the floor, the floor has localized irregularities, the adjustable feet were not correctly set, or the subfloor moves under load.
It can if the floor structure is insufficient, the tile is poorly supported, or the tub's load concentrates on small points. Confirm the product weight, filled weight, support design, and floor-load capacity before installation.
- [U.S. Access Board — Floor and Ground Surfaces Technical Guide]
- [Dal-Tile — DCOF AcuTest: Testing Slip Resistance]
- [Tile Council of North America — DCOF AcuTest Technical Bulletin]
- [ANSI A137.1 / A326.3 Disclaimers and Application Considerations]
- [Horow — How to Level a Freestanding Tub: Step-by-Step Guide]
- [National Tile Authority — Tile Coefficient of Friction and Slip Resistance Standards]


